A few days ago, I released a new web browser extension for Mozilla Firefox and Google Chrome/Vivaldi called tabclip that allows you to copy browser tabs to (or create them from) your clipboard.
The “Copy” button (and associated options) copy tab URLs to your clipboard.
The “Paste” button attempts to find all URLs that appear in your clipboard, then opens each URL in a new browser tab.
That’s it!
Tabclip is heavily inspired by Vincent Paré’s “Copy All Urls” Chrome extension. I created tabclip because I wanted a similar extension that looked and worked the same in both Chrome and Firefox. Tabclip was written from scratch and shares no code with the “Copy All Urls” Chrome extension.
You can get tabclip for Firefox here and for Chrome/Vivaldi here. Tabclip’s source code is available at its GitHub page.
]]>This post is a follow-up to my previous post about the original version of my
zsh
Git prompt, which showed Git information on the right-hand side usingzsh
'sRPS1
prompt.Update on May 30, 2018: Updated the Git prompt code to be slightly cleaner.
I like seeing useful information about Git repositories at a glance on the command line, and after using my previous Git prompt for zsh
for about 4½ years, I decided it was time for some cosmetic tweaks and code cleanup.
This prompt is functionally the same as the previous one, but has been moved from the right hand side to the left-hand side, and includes different symbols for showing the “commits ahead/behind” counts.
Like the previous prompt, this prompt:
git status
:
Here’s a contrived example that demonstrates how the prompt works (click on it for a larger version):
While creating this updated version of my Git prompt, I looked into implementing it using zsh
's built-in vcs-info
mechanism, but attempting to use it only made the code more complicated and cumbersome, so I decided against it.
I use this prompt in combination with the excellent sickill/git-dude
Git commit notifier, which automatically keeps repositories of your choosing up to date, and which will periodically trigger appropriate “commits behind” counts in the prompt when working with those repositories. This solution works great for my needs, but if you’d prefer a zsh
Git prompt that can keep repositories up to date on its own, check out sindresorhus/pure
.
Here’s the code for the prompt, as of this writing. (If I make any changes to the code in the future, the most up-to-date version will always be available in my .zshrc
.)
You can paste this code directly into your .zshrc
, or save it in its own file and source that file in your .zshrc
.
setopt prompt_subst
autoload -U colors && colors # Enable colors in prompt
# Echoes a username/host string when connected over SSH (empty otherwise)
ssh_info() {
[[ "$SSH_CONNECTION" != '' ]] && echo '%(!.%{$fg[red]%}.%{$fg[yellow]%})%n%{$reset_color%}@%{$fg[green]%}%m%{$reset_color%}:' || echo ''
}
# Echoes information about Git repository status when inside a Git repository
git_info() {
# Exit if not inside a Git repository
! git rev-parse --is-inside-work-tree > /dev/null 2>&1 && return
# Git branch/tag, or name-rev if on detached head
local GIT_LOCATION=${$(git symbolic-ref -q HEAD || git name-rev --name-only --no-undefined --always HEAD)#(refs/heads/|tags/)}
local AHEAD="%{$fg[red]%}⇡NUM%{$reset_color%}"
local BEHIND="%{$fg[cyan]%}⇣NUM%{$reset_color%}"
local MERGING="%{$fg[magenta]%}⚡︎%{$reset_color%}"
local UNTRACKED="%{$fg[red]%}●%{$reset_color%}"
local MODIFIED="%{$fg[yellow]%}●%{$reset_color%}"
local STAGED="%{$fg[green]%}●%{$reset_color%}"
local -a DIVERGENCES
local -a FLAGS
local NUM_AHEAD="$(git log --oneline @{u}.. 2> /dev/null | wc -l | tr -d ' ')"
if [ "$NUM_AHEAD" -gt 0 ]; then
DIVERGENCES+=( "${AHEAD//NUM/$NUM_AHEAD}" )
fi
local NUM_BEHIND="$(git log --oneline ..@{u} 2> /dev/null | wc -l | tr -d ' ')"
if [ "$NUM_BEHIND" -gt 0 ]; then
DIVERGENCES+=( "${BEHIND//NUM/$NUM_BEHIND}" )
fi
local GIT_DIR="$(git rev-parse --git-dir 2> /dev/null)"
if [ -n $GIT_DIR ] && test -r $GIT_DIR/MERGE_HEAD; then
FLAGS+=( "$MERGING" )
fi
if [[ -n $(git ls-files --other --exclude-standard 2> /dev/null) ]]; then
FLAGS+=( "$UNTRACKED" )
fi
if ! git diff --quiet 2> /dev/null; then
FLAGS+=( "$MODIFIED" )
fi
if ! git diff --cached --quiet 2> /dev/null; then
FLAGS+=( "$STAGED" )
fi
local -a GIT_INFO
GIT_INFO+=( "\033[38;5;15m±" )
[ -n "$GIT_STATUS" ] && GIT_INFO+=( "$GIT_STATUS" )
[[ ${#DIVERGENCES[@]} -ne 0 ]] && GIT_INFO+=( "${(j::)DIVERGENCES}" )
[[ ${#FLAGS[@]} -ne 0 ]] && GIT_INFO+=( "${(j::)FLAGS}" )
GIT_INFO+=( "\033[38;5;15m$GIT_LOCATION%{$reset_color%}" )
echo "${(j: :)GIT_INFO}"
}
# Use ❯ as the non-root prompt character; # for root
# Change the prompt character color if the last command had a nonzero exit code
PS1='
$(ssh_info)%{$fg[magenta]%}%~%u $(git_info)
%(?.%{$fg[blue]%}.%{$fg[red]%})%(!.#.❯)%{$reset_color%} '
As with the original version of this prompt, I hope this prompt is as useful and as big of a time saver for you as it is for me, and I’d love to hear your thoughts about it!
]]>NOTE: This post will be obsolete soon.
Proper whitespace control was added to Liquid 4. Liquid 4 has now been added to Jekyll, though it’s not part of an official Jekyll release (yet.)
This post applies to Jekyll 3.4.3 and earlier, which use earlier versions of Liquid.
May 29, 2017
This blog is powered by the Jekyll static site generator, which internally uses Liquid Markup for templating.
I noticed that Jekyll-generated output contains unwanted empty lines when there are corresponding Liquid template lines in the source code that wouldn’t otherwise produce visible output.
This example from Liquid’s whitespace control documentation illustrates the problem:
Liquid Input
{% assign username = "John G. Chalmers-Smith" %}
{% if username and username.size > 10 %}
Wow, {{ username }}, you have a long name!
{% else %}
Hello there!
{% endif %}
Generated Output
Wow, John G. Chalmers-Smith, you have a long name!
The empty lines are undesirable since they are unnecessary and they make the generated output uglier.
Here’s my solution for removing empty lines from Jekyll-generated code.
_plugins/regex_filter.rb
with the following contents:# https://stackoverflow.com/a/25802375/278810
module Jekyll
module RegexFilter
def replace_regex(input, reg_str, repl_str)
re = Regexp.new reg_str
# This will be returned
input.gsub re, repl_str
end
end
end
Liquid::Template.register_filter(Jekyll::RegexFilter)
{% capture output %}
Content starts here
Here are lines with more content
{% if false %}This generates a blank line that will be stripped from the output{% endif %}
Content ends here
{% endcapture %}{{ output | replace_regex: '^\s*$\n', ''}}
The idea is that a block of template-generated output is captured within the template itself, then fed to a custom Liquid filter (the Jekyll plugin) that removes all empty lines using a regular expression.
The {% raw %}{% endcapture %}{% endraw %}
and {% raw %}{% output %}{% endraw %}
Liquid tags appear on the same line to prevent an empty line from appearing at the top of the generated output.
You can chain multiple invocations of the replace_regex
filter together if you want to perform multiple distinct whitespace transformations.
This is a simple idea, but I think it helps make Jekyll-generated code more pleasant to look at.
]]>Universal Links first appeared in iOS 9. According to Apple’s Supporting Universal Links document:
When you support universal links, iOS 9 users can tap a link to your website and get seamlessly redirected to your installed app without going through Safari. If your app isn’t installed, tapping a link to your website opens your website in Safari.
This is a great idea in principle, since one URL can serve two purposes without needing to use custom URL schemes, but Universal links were not working as advertised for me and I figured out why. If you are having problems getting Universal links to behave as expected, I hope this article can help.
I use imgur and have its associated app installed on my phone, but I noticed that the “Open In App” buttons that appear on its mobile site (highlighted below) all loaded the App Store page for the imgur app instead of loading the content inside the imgur app as the buttons claimed they would.
I figured there was some glitch with the buttons that was mistakenly redirecting me to the App Store. Imgur’s App Store page showed the “Open” button that normally appears when you look at an App Store page for an installed app, so for a while it never occurred to me to press the button since I figured it would just open the app to its default state, just like it does when manually viewing its App Store page by searching for it in the App Store.
I was wrong.
It turns out that tapping the Open button on an app’s App Store page after being redirected to it by tapping a Universal Link will open the linked content in-app, rather than the default/front page of the app.
There is no visual indication that App Store page “Open” buttons have different behaviors when being redirected from a Universal Link versus browsing the App Store manually, even though this is clearly the case.
Regardless, I expected “Open In App” to actually load the linked content in-app and not to add an extra step of loading an app’s App Store page.
After doing some Internet digging, bullet point 4 of this StackOverflow answer shed some light on the situation.
First, some terminology: I will refer to a Universal Link as enabled if tapping it causes content to load in-app, and disabled if tapping it causes content to load in a web page or causes an App Store page to open.
It turns out that different URL paths under a single domain name can be independently set to have their corresponding Universal Link behavior be enabled/disabled depending on how the developer configured them (see the “Creating and Uploading the Association File” section of Apple’s Supporting Universal Links document), and that the per-Universal Link setting stays in effect until it is changed again.
This means that the instructions below may need to be repeated multiple times for a single site.
Another factor that adds to the confusion is that there is no way to tell whether a given Universal Link is enabled/disabled other than tapping it to see what its behavior currently is.
If tapping a Universal Link currently opens a web or App Store page as described above but you want the link to cause content to load in-app, that means the Universal Link is currently disabled. Here’s how to enable it:
Try pulling down/scrolling up on the web site when the page view is already scrolled all the way to the top to reveal an Open in the [App Name] App
banner as pictured below:
Tapping the banner will enable the Universal Link and cause the content to load in-app.
If no banner appears as shown above, tap and hold on the Universal Link until a dialog with buttons appears. If you scroll through the buttons, one should say Open in "[App Name]"
as pictured below:
Tapping the Open in "[App Name]"
button will enable the Universal Link and cause the content to load in-app.
Once the Universal Link is enabled (content loads in-app), it will always load in-app in the future unless you [re]disable the Universal Link as described below.
Note that when tapping a disabled Universal Link causes a redirection to an app’s App Store page, tapping the “Open” button on that page will cause content to load in-app that one time, and will not enable that Universal Link for future use as described above.
If tapping a Universal Link currently causes content content to load in-app but you want the link to open a web (or App Store) page, that means the Universal Link is currently enabled. Here’s how to disable it:
When content has loaded in-app after tapping a Universal Link, you should see some text at the very top-right of the screen in the iOS status bar with the domain name of the page whose Universal Link redirected you to that app, as pictured below:
Tapping that text will cause the content to open in a web (or App Store) page and will disable the Universal Link that opened the app.
Once the Universal Link is disabled (content doesn’t load in-app), content will never load in-app in the future unless you [re]enable the Universal Link as described above.
If you want to view content from an enabled Universal Link on the web after its content loads in-app just one time/without disabling the Universal Link entirely, don’t tap the Status Bar text; instead, just switch back to your web browser.
The behavior of disabled Universal Links causing redirections to an App Store page instead of loading content in a web page appears to be web site-specific.
In the case of my imgur example, the App Store redirection seems to be functionality that imgur explicitly implemented to try to steer users towards using their app instead of their web site, since tapping a disabled Universal Link on imgur’s web site does appear to load another page on the web site for a split second before redirecting to imgur’s App Store page. In other words, the Universal Link correctly opens imgur’s web site as expected, which itself then redirects to imgur’s App Store page (where the “Open” button would cause the content to load in-app one time as described above.) It’s possible that other sites would load web content in a web page as expected when tapping a disabled Universal Link, rather than redirecting users to an App Store page as is the case for imgur.
The mechanisms built in to iOS for enabling and disabling Universal Links are difficult to understand, and the fact that settings are sticky/permanent and can independently vary across given Universal Links under a single domain is not made apparent whatsoever by the UIs iOS provides around this feature.
This confusion is compounded when developers implement behavior that causes web sites to open App Store pages when tapping disabled Universal Links (as imgur seems to have done), causing content not to open in a web view as expected, despite the fact that the Universal Link is disabled.
“Open in App” links behaving differently than I expected was a large source of frustration for me when browsing the web on iOS. Given how confusing this issue was to understand, solve, and then write about, I hope this article was helpful.
]]>I had the privilege of attending An Event Apart, “the design conference for people who make websites”, for the fourth time. My notes from An Event Apart Boston 2015 follow this introduction. The notes are grouped by talk, in the order that each talk happened at the conference.
If you’re interested, my notes from An Event Apart Boston 2014 are also available.
srcset
attribute and the <picture>
element.<picture>
element.src
attribute in an <img />
tag, inline in the HTML, or referenced with url()
in CSS.gzip
works very well since SVG has lots of repetitive strings.<svg>
= “image” / <span>
= “nothing”To me, the concept of responsive web design means first and foremost that web sites should be able to adapt themselves for optimal viewing across any type of device. Implementing responsive designs is made easy through the use of CSS media queries, which have been supported in all major web browsers for some time now.
Web standards and browsers have obviously not stopped evolving, which brings me to my key takeaway from this conference: the continuous evolution of browser technology is pushing the envelope of what responsive design means. We are starting to have the tools to be able to show users the information or content they desire in the appropriate context, and a user’s particular device is only one of many aspects of their context (see my notes from Derek Featherstone’s talk for examples.)
As always, technology itself doesn’t automatically lead to good design, but gives us the means to achieve it. Newer and better technology, when leveraged correctly, can lead to better design.
Of course, An Event Apart Boston’s traditional, renowned bacon cupcakes also help.
]]>I’ve always wanted to be able to send a tab from an iOS web browser to a Mac web browser. Despite the existence of browser features like Safari’s iCloud Tabs and Google Chrome’s Tab Syncing, or even services like Instapaper or Pocket, I wanted a way to “send and forget” a browser tab from an iOS device to a Mac for future reference, then close the tab on my iOS device without giving it another thought.
When Workflow for iOS launched in December 2014, I knew that I could use it to implement this idea.
The system described below should work with any iOS browser that uses the standard iOS share sheet, as well as any Mac browser on the receiving end. I’ve tested this system with different combinations of Chrome and Safari on both sides, and it works great in all cases.
I will not go into step-by-step detail for configuring Workflow or Hazel, so if you’re new to either of them, you should download them and experiment with them before continuing.
This is how the system works from end to end, which should give you some context before you start configuring things:
Make a list of all Macs you want to be able to send tabs to. My Macs are named after characters from the television show Archer, so my list looks like this:
If you aren’t weird enough to name your computers, your list might include things like “MacBook Pro” and “iMac”.
Create a new folder anywhere in your Dropbox called “Send Tab” or anything else that works for you, and then create subfolders inside it for each Mac on your list.
My directory structure looks like this:
$ tree ~/Dropbox/App\ Databases/Workflow/Send\ Tab
/Users/Josh/Dropbox/App Databases/Workflow/Send Tab
├── archer
├── cheryl
└── malory
3 directories, 0 files
The Hazel rule shown below should be configured for each Mac on your list.
On each Mac, the rule should be configured to monitor the corresponding Dropbox subfolder that you created for that Mac.
You can change "Google Chrome"
to any browser you want, and you can opt to use different browsers on different Macs if you wish. Make sure that the browser you choose is inside your Mac’s /Applications
folder, that you type the browser’s name exactly as it appears there, and that the browser’s name is quoted, as shown.
For your copying-and-pasting convenience, here’s the script that is embedded in the Hazel rule:
url=`cat "$1"`
open -a "Google Chrome.app" "$url"
rm -f "$1"
The Workflow workflow (not a typo!) shown below should be configured on each iOS device you want to send tabs from.
This workflow is an Action Extension workflow that is configured to accept URLs.
For convenience, you can install the workflow by visiting this link on your iOS device instead of reconstructing it manually.
If you’re curious, here’s what the workflow looks like:
You’ll need to customize the list of Macs, as well as the “Destination Path” in the “Save to Dropbox” action.
A key point is that the Destination Path ends with a variable that corresponds to the selected Mac. For reference, my Destination Path looks like this, although it doesn’t all fit on the screen in the Workflow app: App Databases/Workflow/Send Tab/<computer>
. This means that the Macs in the workflow’s list need to match their corresponding subfolder names in Dropbox.
Now that you’ve finished configuring Hazel and Workflow, you should be able to send browser tabs from your iOS device(s) to your Mac(s), like this:
As of this writing, Hazel and Dropbox don’t always work together on OS X Yosemite. If Workflow is adding files to your Dropbox but the Hazel rule never triggers on its own/only works when run manually, try this workaround I that discovered through experimentation: Create a folder somewhere outside Dropbox on your Mac, configure the Hazel rule to watch it. Then, symlink that folder into your Dropbox folder, in a location that it will appear as that Mac’s “send tab” subfolder (to match the iOS workflow.)
Here’s an example of how to set up the workaround:
$ ln -s ~/path/to/the/real/folder/cheryl ~/Dropbox/App\ Databases/Workflow/Send\ Tab/cheryl
Allowing Hazel to watch the non-Dropbox folder allows Hazel’s automatic rule triggering to work, while still allowing Dropbox syncing to work via the symbolic link.
If you’re obsessed with sending tabs between devices like me, you might enjoy these two relevant free utilities:
Updated on January 28, 2015: Updated the Hazel rule embedded script and associated screenshot to use and be compatible with bash — which is the default for most users — instead of zsh.
]]>I had the privilege to once again attend An Event Apart, “the design conference for people who make websites.” My notes from An Event Apart Boston 2014 follow this introduction. The notes are grouped by talk, in the order that each talk happened at the conference.
During his talk at the conference, Scott Berkun mentioned his concept of Min/Max Note Taking. This got me thinking about my approach to conference note taking (and publishing). During the conference, I try to capture as many interesting or useful points in my notes as I can, in real time. This method of note taking certainly doesn’t work for everyone, but I find that it helps reinforce the speakers’ ideas in my head.
Notes in summary or “handful of bullets” format would certainly be easier to consume than the wall of text that appears below, but the notion of trying to summarize others’ ideas for consumption doesn’t sit right with me. Summarizing could filter out information or ideas that someone could find useful, or even worse, could accidentally skew the information. To that end, I decided stick with the “wall of text” approach to publishing my notes that I’ve used. Before publishing my notes here, I extensively edit them for clarity and typos, but I don’t make any attempt to summarize them or make them otherwise more digestible.
If you’re interested, my notes from An Event Apart Boston 2013 are also available.
I should point out that Sarah’s “Designing with Data” presentation used data from her business, Blushbar, to make its points. I was impressed that she used the presentation itself to practice what she preached.
Dan outlined a “modern web design process, in four easy payments.”
A principle internally motivates us to do things that seem good and right. A rule externally compels you to do things someone else has deemed good and right.
<datalist>
element are the bastard love child of the <input>
and <select>
elements.<datalist>
can also be used as a placeholder with a “for example” or “e.g.” prefix.<a href="javascript:void(0)">Download</a>
broke the ability to download Google Chrome when the download page’s JavaScript stopped loading.)rel
attribute can be used to make prefretching suggestions to the browser to optimize performance.content-type
s can have different performance impact(s) for the page.<head>
of the document, the browser can’t process the rest of the page until it has finished processing that file.<head>
). Load all JavaScript asynchronously.#rrggbb
hex syntax
rgb()
syntax#rgb
shortened hex syntaxhue-rotate
filter is useful for colorizing images when applied on top of a sepia
filter.multiply
blending mode tends to makes colors darker. (For example, red[255,0,0] × blue[0,0,255] = black[0,0,0,].)transparent
keyword is a shorthand for transparent black, so linear-gradient(90deg, white, transparent)
will actually fade from gray instead of pure white. Use hsla()
transparent white instead (linear-gradient(90deg, white, hsla(0,0%,100%,0))
).indianred
, navajowhite
, and peru
darkgray
which is actually lighter than gray
, due to backwards compatibility (gray
is halfway between white and black in RGB.)currentcolor
keyword is the first variable we ever got in CSS.gray(%, alpha)
function#rgba
and #rrggbbaa
color()
function and adjusters<angle>
in hsl()
rgb()
and hsl()
will accept alpha values<img lazyload />
Here are my takeaways from the conference:
Finally, I have to mention that I was delighted to see that last year’s bacon cupcakes made a welcome reappearance this year:
As always, An Event Apart was well-organized, informative, and served as a terrific inspirational recharge.
]]>After a few years of waffling back and forth over whether I really needed a NAS, I finally decided to buy one. After doing some research, the option that seemed best for my needs was the Synology DS214+. Synology DiskStation NASes run a Linux-based operating system called Synology DiskStation Manager (DSM). Through sheer dumb luck, I happened to purchase the NAS exactly one month after the release of a new major version of the software, DSM 5.0. The NAS was a breeze to set up, including the including the installation of the two 3 terabyte Western Digital Red hard drives I bought for it.
In general, the NAS’s hardware and software are both great quality, but I ran into some issues after trying to interact with the NAS via SCP/SFTP. This article explains how to get SCP/SFTP working properly in DSM 5.0, exclusively using the stock software. This article assumes a basic knowledge of Linux and the DSM web interface, and thus has a corresponding level of detail. As far as I know, this information should apply to any Synology NAS running DSM 5.0, and was tested with DSM 5.0-4458 Update 2.
DSM 5.0 includes two independent groups of service settings for SSH and SCP/SFTP.
Enable the SSH service by checking the Control Panel → “Terminal & SNMP” menu → “Terminal” tab → “Enable SSH service” checkbox.
Enable the SFTP service (not to be confused with FTPS!) by checking the Control Panel → “File Services” menu → “FTP” tab → “SFTP” group → “Enable SFTP service” checkbox.
At this point, you should be able to successfully SSH to your NAS when authenticating as root
or admin
. Both users will have the password you chose for admin
during setup. By default, those are the only two users that will be able to log in via SSH.
If you’d like to enable SSH for other users, SSH in as root, and edit the file /etc/passwd
with vi. Each user has a corresponding line in this file, and a user’s shell setting appears at the end of a given line, after the last colon. Any user that has the the default shell setting /sbin/nologin
won’t be able to log in via SSH. To enable SSH for a given user, change their shell setting to match the shell setting for the root and admin users, which should be /bin/sh
. Be careful when editing the /etc/passwd
file; for our purposes here, you should only change the shell setting that appears after the last colon on a given line.
Upon SSHing in as any user besides root
, you might see a warning message (this example is for the “admin” user):
Could not chdir to home directory /var/services/homes/admin: No such file or directory
This warning happens because home directories are controlled by DSM’s “user home service”, which is disabled by default. To prevent the error, enable the user home service by checking the Control Panel → “User” menu → “Advanced” tab → “User Home” group → “Enable user home service” checkbox.
I recommend enabling the user home service even if you don’t plan on using home directories, since leaving it disabled may cause some programs that rely on SCP/SFTP (rsync
, etc) to abort with errors, regardless of which directory you’re trying to manipulate.
By default, a given user’s home directory is located at /volume1/homes/username
.
If you plan to use SSH public key authentication for a given user, the default permissions on user’s home directories will prevent that. Making the permissions more restrictive (doing a chmod 755
on a user’s home directory as root
) will allow SSH public key authentication to work properly. Of course, the user’s ~/.ssh
folder and ~/.ssh/authorized_keys
file also need to have the correct permissions (chmod 700
and chmod 644
, respectively.)
After performing all of the aforementioned configuration tweaks, you should now have a painless SSH and SCP/SFTP experience with your Synology DiskStation NAS.
One final tip: I’ve determined through experimentation that shared folders are served relative to the filesystem root (/shared_folder
) when accessing the NAS via SFTP, but are served relative to the volume folder (/volume1/shared_folder
) when using SCP. If specifying paths one way doesn’t work, try the other way.
What’s in your pockets right now?
Maybe you have a bag with you, what’s in there?
You may not have given too much thought to the things you carry around every day, but there is a term dedicated to the concept: “everyday carry”, or EDC.
Wikipedia defines everyday carry better than I ever could (selections edited):
Everyday carry refers to a small collection of tools, equipment and supplies that are carried on a daily basis to assist in tackling situations ranging from the mundane to the disastrous.
The term EDC also refers to the philosophy or spirit of “preparedness” that goes along with the selection and carrying of these items. Implicit in the term is the sense that an EDC is an individual’s personal selection of equipment, arrived at after deliberation, rather than a standardized kit.
EDC items normally fit in pockets or a small pack, and/or are attached to clothing such as a belt. Emphasis is placed on the usefulness, accessibility and reliability of these items.
EDC is a hobby of sorts, so it shouldn’t be surprising that there are many blogs and even entire communities dedicated to the concept.
I’ve always loved gadgets of all kinds, and thus gave lots of thought to my EDC long before I first heard the term.
Before reading any further, you should know that I don’t consider myself to be an expert in any of the topics I’m going to mention, just someone who is enthusiastic about EDC and who has done a fair bit of research. It’s possible that there could be inaccuracies in what I’ve written here; if you notice any, please tell me! My hope in writing this is to get you to think about your EDC and to offer some examples and resources along the way.
My mentality has a lot to do with what Dustin Curtis refers to as “The Best”. Here are some relevant excerpts:
“The best” isn’t necessarily a product or thing. It’s the reward for winning the battle fought between patience, obsession, and desire. It takes an unreasonably long amount of time to find the best of something. It requires that you know everything about a product’s market, manufacture, and design, and that you can navigate deceptive pricing and marketing. It requires that you find the best thing for yourself, which means you need to know what actually matters to you.
If you’re an unreasonable person, trust me: the time it takes to find the best of something is completely worth it. It’s better to have a few fantastic things designed for you than to have many untrustworthy things poorly designed to please everyone. The result—being able to blindly trust the things you own—is intensely liberating.
From an EDC perspective, “the best” doesn’t necessarily mean “the most expensive” or “the flashiest”. To me, it means that each individual item in a person’s EDC is the ideal realization of that item for that person. It also means that all of the items in a person’s EDC should cohesively complement each other as the best possible EDC for that person. It means that the things a person carries with them every day should deserve to be carried every day.
For example, if you carry a wallet, is your wallet really “the best” wallet for you? Is it a George Costanza wallet that just needs to be cleaned out? Or maybe your wallet is bursting at the seams with plastic cards, and carrying a separate cardholder would make more sense? As another example, maybe finding your keys when you get home always ends up being an adventure in your bag, and then you end up fumbling with them in the dark? Could a better keychain and a small flashlight remove that small amount of frustration from your everyday life?
I am obsessed with removing frustrations like these, and that’s why I care about finding “the best” EDC for myself. I try to keep my EDC as minimal as possible while still being functional. Being the gadget lover that I am, I also enjoy taking the time to put some thought and research into everything I carry.
All of that said, there’s no such thing as the “perfect EDC”. A person’s EDC will naturally change and evolve over time to meet their needs, always working towards “the best” EDC for them. What’s more, one person’s ideal EDC certainly isn’t going to be ideal for everyone. If you work in an office like I do, your EDC is probably going to look very different than that of someone who, for example, works on oil rigs.
Seeing others’ EDC is both informative and fascinating, not only because you can draw inspiration for your own EDC, but also because it’s interesting to see the stories that people’s possessions tell about them.
To that end, I’ll go through my own current EDC in detail and explain some of the thinking behind it. Even so, my EDC is always changing and evolving over time. While I certainly carry different things or sets of things depending on the situation (for example, I bring a laptop messenger bag to work), I consider my “EDC proper” to be the things I carry almost all of the time, regardless of the situation or context.
Without any further ado, here’s what it looks like:
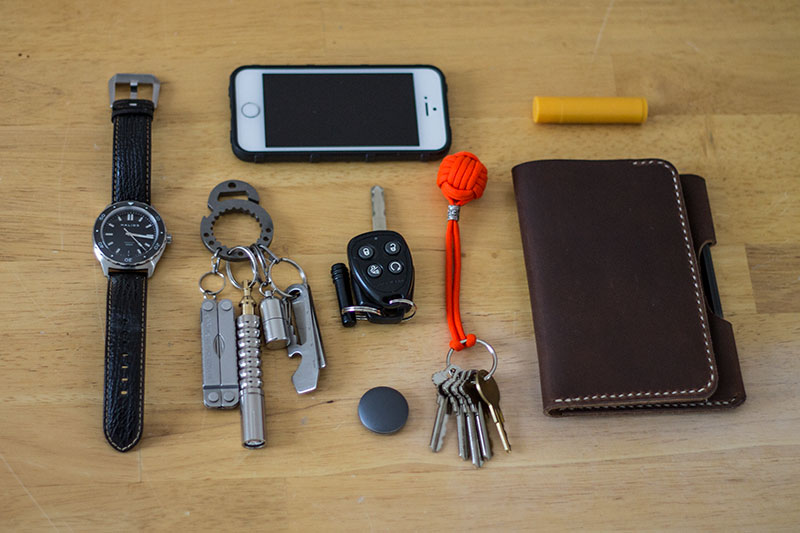
So, what is all that stuff?
I’m not a fan of money clips, so I carry a wallet. My wallet is a Park Sloper Senior from One Star Leather Goods. I carry a few cards including credit/debit cards, insurance cards, and my driver’s license. I also like carrying paper money if I happen to need it, but I avoid carrying coins. One Star Leather Goods is a one-man operation running out of Los Angeles, CA. This is what appears on their Etsy people page:
“Buy good things, own them for a long time.”
That napkin wisdom is borrowed from the internets and it’s message is the basis of my philosophy. Today’s “buy it cheap then throw it away” consumer environment is unsustainable and largely irresponsible. Do your research, find something that suits your needs and is well made, pay a fair price for it and be rewarded by years of happy use. Support your local independent craftsman over a big box retailer and search out unique and well made items.
While I believe that “the best things in life aren’t things,” the things that you do need should be pleasurable to use and pleasurable to look at: simple, functional, durable and beautiful. I have a somewhat obsessive desire for perfection and put a high value on items that are designed and executed to the highest standards…
Sound familiar?
I love the Park Sloper Senior because it looks classy, it’s an extremely high quality handmade piece, and it holds my cash and cards while also accommodating a notebook and pen, all without being too bulky. Its larger size makes it strictly a “jeans back pocket” wallet, which isn’t for everyone, but One Star does make a smaller, front-pocket-friendly version of the Park Sloper. I like carrying a notebook and pen in order to use the Bullet Journal system, which I’ve found works well for me—better than any productivity-related iPhone app I’ve tried. I use a Field Notes 48-page notebook and a Uni-Ball Style Fit pen with a 0.7mm Jetstream refill. Sometimes, I also carry a 0.7mm Uni-Ball Jetstream RT pen. The Park Sloper easily accommodates the slim Style Fit (thanks, Brad!), but the Jetstream RT is too thick to fit into the Park Sloper. Uni-Ball’s Jetstream series pens are cheap, write smoothly, and are very highly regarded. Most importantly, Jetstream ink dries quickly; as a lefty, ink doesn’t smear all over my hand when I write.
Before arriving at the Park Sloper, in the past (going back a few years—I don’t buy wallets frequently and don’t want to have to), I’ve also tried:
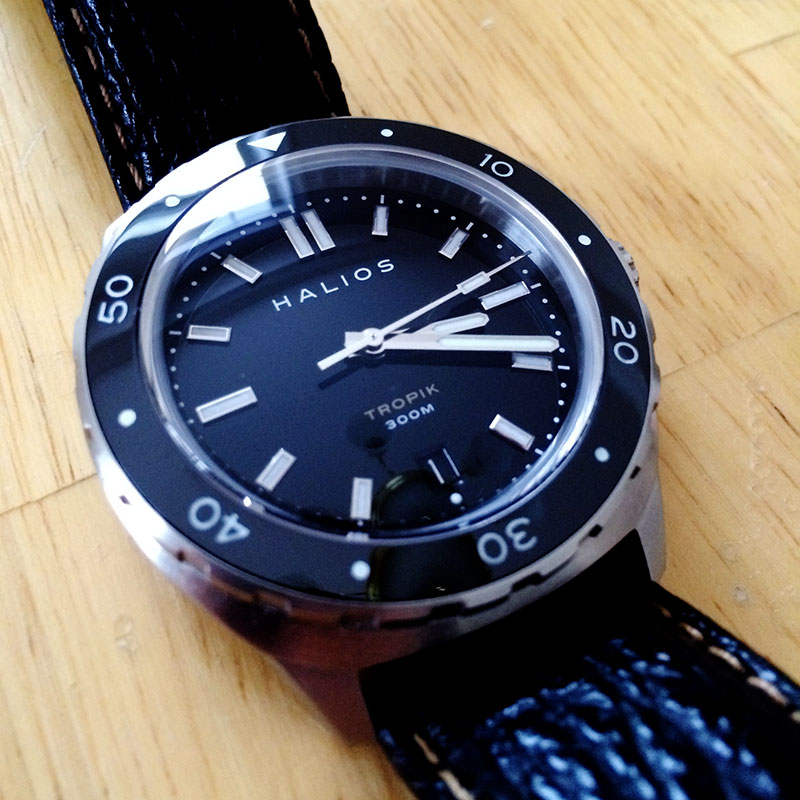
I’ve always loved watches. With today’s ubiquitous mobile phones, many people no longer bother wearing a watch, but I can’t picture myself without one. I especially love mechanical watches (as in “no electricity involved”), although they certainly don’t keep time as accurately as quartz watches. I think there’s something special about keeping a tiny, intricate, dependable machine on your wrist, with you always.
When it comes to the outward look and design of a watch, I’m a fan of understated simplicity. I’ve gone through far too many watches to list here, and wear different ones depending on my mood, but here are my current three favorites:
If you’re intrigued by mechanical watches but have reservations about buying one, they don’t necessarily have to break the bank—the Seiko SNK809 is a great entry-level automatic (self-winding) mechanical watch. If you want to learn more about the world of watches in general, this excellent primer from Everyday Commentary is a great place to start.
Tools and gadgets encompass what is probably the largest rabbit hole as far as EDC is concerned; there are an overwhelming number of EDC-related tools—and options for carrying tools—available on the market.
Gadgets known as “pocket danglers” or “suspension clips” are popular among EDC enthusiasts. These gadgets provide a way of attaching tools/keys/other gadgets to them, and hang from a pocket or belt loop. The idea behind them is that they “suspend” attached items in the middle of a pocket in order to prevent those items from awkwardly bunching up at the bottom of a pocket. Suspension clips and pocket danglers often double as tools themselves.
I currently use a TT PocketTTools 69 Dangler Tool, which doubles as a bottle opener and cap twist assist. Although I don’t use the twist assist, it’s handy to always have a bottle opener on my belt loop. I love that the dangler is designed in such a way that its use as a bottle opener isn’t obstructed by the items attached to it. I’ve tried a few other danglers/suspension clips in the past:
My tools and gadgets are attached to the 69 dangler using a combination of common split rings and TEC Accessories 15 mm Pico Gate Clips. All of the attached tools can be easily removed from the dangler without fiddling with split rings. The tiny gate clips perfectly fit into the dangler’s holes and are used to attach tools that don’t provide their own detaching/quick release mechanism. All other tools are directly attached to the dangler with split rings.
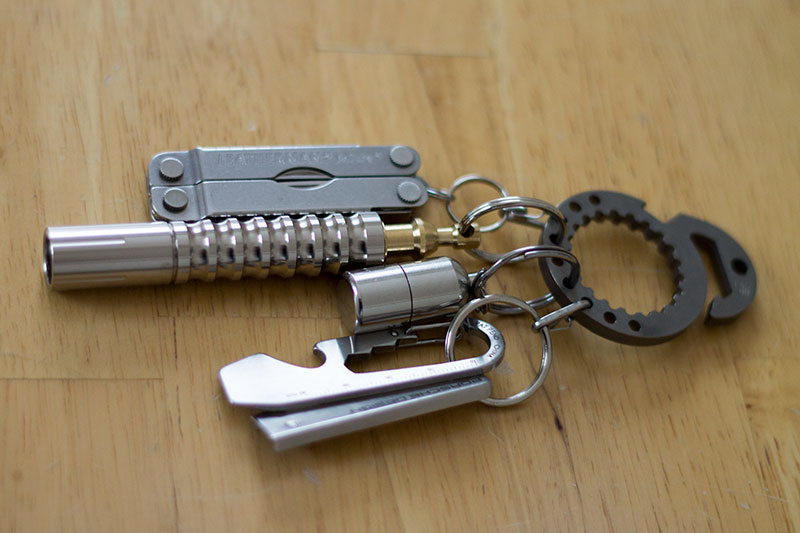
From top to bottom, these are the items attached to the 69 dangler:
There are a few other things I carry that don’t need much elaboration:
…And there you have it: my EDC explained in painstaking detail. As you can see, I’ve put a lot of thought (and over time, a pretty penny) into my EDC, and it is constantly evolving.
There are several types/categories of tools I used to carry that have either been displaced by what I’m carrying now, or that I discovered I can get along just fine without. There are hundreds or even thousands of tools available on the market in each of these categories, made by both production manufacturers and smaller, custom manufacturers or individuals.
Needless to say, researching and choosing tools in these categories can easily be overwhelming.
Most of these categories have Internet communities dedicated to them, which can help with research. Although I don’t participate directly in most of the communities I’m going to mention, I’ve discovered them through Google and other Internet EDC research.
I’ve carried flashlights for a very long time. I use them constantly, whether it’s for doing something outdoors at night or for being able to see better in tight spots behind computers. For a while, I liked carrying a pocket-sized clip-on flashlight as part of my EDC, but I eventually realized clip-on flashlights generally produced more light than I needed in most situations, and therefore weren’t worth the space they occupied in my pocket.
Before I added the aforementioned Prometheus Lights Beta-QR to my EDC, I carried a Veleno Designs/Steve Ku Quantum D2. The D2 is tiny, which is both a good and bad thing. Its small size makes it easy to carry, and it has great light output for its size. However, it uses an obscure type of rechargeable lithium ion battery (which needs to be recharged fairly often due to its size.) I ended up switching to the Beta-QR since it’s still a manageable size and uses a standard AAA battery (NiMH rechargeable or alkaline), both of which are much more readily available and have higher capacities than the D2’s battery, and therefore less likely to let me down when I need to rely on the light.
If you want to do more research on flashlights, the predominant flashlight community on the Internet is Candle Power Forums. When researching flashlights, pay close attention to the type of batteries they use. A flashlight’s batteries give you a general idea of its size and runtime. Additionally, some flashlights use slightly less common types of batteries such as CR123 cells, which could either be acceptable or negative depending on your needs.
Although there are dozens of flashlight manufacturers, some popular manufacturers in no particular order are 4Sevens, Fenix, EAGTAC, and Sunwayman.
I don’t carry a knife for self-defense purposes; instead I carry one simply because a knife is handy to have around. I primarily use knives for opening bubble mailer envelopes, for opening and breaking down boxes, and for cutting cable ties. In a similar vein to flashlights, I’ve gradually minimized my knife carry over time. (Do you see a trend here?) I used to carry a folding knife but eventually realized I generally didn’t need a folding knife on my person at all times. In combination, the aforementioned Nite Ize DoohicKey and Leatherman Micra work well for 90% of my cutting tasks. I still keep folding knives around (though not as part of my EDC) for everything else.
There’s a lot to learn about knives, including types of blade steels and shapes, handle (“scale”) materials, locking mechanisms, and stropping and sharpening tools and techniques. As with flashlights, there are Internet knife communities such as Blade Forums and Knife Forums that can help with further research. Also as with flashlights, there are dozens of knife manufacturers. Some popular knife manufacturers, again in no particular order, include SOG Knives, Columbia River Knife and Tool (CRKT), Spyderco, Kershaw Knives, Benchmade, and Böker.
Although I no longer regularly EDC a folding knife, I still have some favorites:
I personally categorize multitools into two distinct groups. The first group is what I would call “conventional” multitools such as Leatherman’s folding tools or Victorinox Swiss Army knives. (I believe Swiss Army knives are better categorized as multitools rather than knives, but it’s a matter of opinion.) The second group is what has come to be known as “one-piece multitools”, or “OPMTs”. OPMTs are generally milled from a single piece of metal and have no moving parts.
The predominant Internet multitool community is multitool.org.
Similar to my thinking behind carrying a knife, I think multitools are simply handy to have around. Many multitools have an integrated knife which may be fine for your needs, and could eliminate the need to carry a separate, dedicated knife, which is what happened in my case.
I’ve carried a few different multitools across both types, and in fact, still do: the Leatherman Micra, the Nite Ize DoohicKey, and the TT PocketTTools 69 Dangler Tool. (I would classify the DoohicKey as an OPMT even though it’s not technically a single piece of metal.)
That said, I’ve done the least amount of experimenting in the multitool category.
For a while I carried a Victorinox Rambler which I loved as a multitool, but which ended up getting beat up by the rest of my EDC gadgets to the point that it started bothering me. I also tried carrying a larger Leatherman Sidekick, which is reasonably affordable at about $30, but it ended up being too large and cumbersome for my own EDC purposes. I still keep it in the laptop bag I take with me to work. (If you like the Sidekick, you might also want to take a look at its brother, the Leatherman Wingman.)
In terms of OPMTs, Atwood Knife and Tool is probably the biggest name in the game. Peter Atwood makes and sells his own tools in batches on his blog. They usually sell out within minutes, and are often resold with a large premium on eBay. I’ve been lucky enough to be able to purchase a few OPMTs directly from Peter. While his tools are extremely well made, I no longer carry them as part of my EDC because I didn’t use them often enough to justify their size and weight (and no, I still have them—I haven’t resold them on eBay!)
Many other individuals make and sell OPMTs, such as the aforementioned TT PockeTTools, which I understand is also a single-man operation. Various bigger companies also sell OPMTs. Leatherman has its own line, and Gerber sells the Shard Keychain Tool, which is extremely affordable at about $6.
I’ve given you a detailed tour of my EDC, and I’ve explained the thinking behind some of my past and present EDC choices. I’ve also pointed out some resources that you can use to do your own EDC research.
EDC as a hobby can certainly be interesting and fun in and of itself, but don’t take it too seriously—lots of EDC experimentation can get expensive quickly! Take some time to think about what works for you and what could be made better, then experiment.
Ultimately, your EDC is an expression of yourself, and should augment your day-to-day life. Get out there and live it!
2014-02-02: Added information about the Uni-Ball Style Fit pen that was accidentally omitted.
]]>When I saw that the excellent weather service forecast.io released a feature called Forecast Embeds, I thought it would be neat to show the widget directly on my Mac’s desktop. I whipped up a solution that ended up looking like this:
Read on to learn how get Forecast Embeds up and running on your Mac’s desktop.
forecast_snapshot.sh
, a simple shell script I wroteforecast_snapshot.sh
script automatically takes a screenshot of the Forecast Embeds page with the latest weather data, and stores that screenshot on the filesystem. It then does some image processing on the screenshot to make it look more attractive when overlaid onto a wallpaper.Install the dependencies listed above, and grab a copy of the forecast_snapshot.sh
script.
Edit the variables in forecast_snapshot.sh
to your liking.
You’ll need to provide the latitude/longitude for your area, which you can find using a service like latlong.net. There are several available options that aren’t part of the script, but can be added to the Forecast Embeds URL in the script. See the Forecast Embeds documentation for details.
Run forecast_snapshot.sh
and verify that the image file /tmp/weather-full.png
is created on your system, and contains the font/text/weather information you expect.
Embed the /tmp/weather-full.png
image on your desktop using GeekTool (or your tool of choice.) I configured GeekTool to refresh the image every minute.
Make forecast_snapshot.sh
automatically run on an interval (15 minutes seems reasonable). You can do this via GeekTool or launchd
.
You’re done.
Forecast Embeds are simple web pages that include animations, so the sceenshots that are taken will inevitably catch the animations mid-frame. If you prefer to keep the animations working, you can use something like Fluid to float the Forecast Embeds page on your desktop as its own app, but it won’t be transparent and thus won’t blend in with your wallpaper.
]]>As I wrote in a previous post, I constantly use Git on the command line. The command line is simply the fastest and easiest way for me to work with Git.
That said, one understandable aspect of working with Git on the command line is that file/directory paths must be explicitly specified. This means that while in the middle of typing a Git command, I often end up needing to do one or both of the following:
Move a hand from the keyboard to the mouse in order to select and copy a path from the output of git status
, then return to the keyboard to paste the path
cd
to a random directory (usually aggressively ramming the tab key) in order to either get git status
to spit out a copyable path, or at least low enough into the directory tree to be able to have git <git command> .
manipulate the desired path(s)
While neither of these take a long time, they’re both annoying.
After searching for tools to attack this problem and not finding anything that worked well for me, I decided to create git-fuzzy
.
git-fuzzy
simply wraps normal Git commands and (for now) assumes that its last argument should be a path that should be fuzzy-completed.
So, instead of having to do something like:
git add another/very/long/path/myawesomefile.ext
git-fuzzy
makes things pleasantly fuzzier:
git fuzzy add awesome
The tool is tiny, basic and somewhat crude, but so far it gets the job done for me.
git-fuzzy
is available on GitHub and is installable via npm
.
If you end up using git-fuzzy
, I’d love to hear your thoughts about it.
An Event Apart bills itself as “the design conference for people who make websites.” I attended last year, and was very fortunate to be able to attend once again this year. Here are my notes in their entirety from An Event Apart Boston 2013. My notes are grouped by talk, in the order that each talk happened at the conference.
click
events have a 300ms delay since the browser waits to confirm whether the user is single- or double-tapping. Can work around this by:
touchstart
/touchend
events, but that may have unintended side-effects, unintentionally triggering those events when scrollingsetTimeout()
isn’t accurate enough for animations (frame scheduling.)
requestAnimationFrame()
, which has great browser support.left
/top
.left
/top
look jittery since they snap to the pixel grid; transforms don’t snap to the pixel grid.em
units based on readability, not screen/device measurements.In industry after industry…the new technologies that had brought the big, established companies to their knees weren’t better or more advanced—they were actually worse. The new products were low-end, dumb, shoddy, and in almost every way inferior. But the new products were usually cheaper and easier to use, and so people or companies who were not rich or sophisticated enough for the old ones started buying the new ones, and there were so many more of the regular people than there were of the rich, sophisticated people that the companies making the new products prospered.
—The New Yorker, When Giants Fail
clear
is the only reason we used floats for layout, otherwise we would have stuck with tables.clear
was a screwdriver we used to pound in a nail since no one had given us a hammer yet.”justify-content
and flex-wrap
replace the need to do width/margin/wrapping calculations.display: flex
must be applied to the parent element of whatever elements you want to be flexible.order
. Regardless of order, selectors (:first-child
, :last-child
, etc.) will still respect the DOM and ignore the flex flow.Interactive slides are available at http://lea.verou.me/more-css-secrets.
background-attachment: local;
padding
with calc
.calc
(except Opera).transition
property itself does not transition.line-height
of the text.background-origin
property (background-origin: content-box;
)background-origin
.transform-origin
, then counter-rotate the original element so it always faces the same direction while tracing a circular path (doesn’t rotate in place.)@keyframes
for both animations, but reverse one animation with animation-direction
.filter: drop-shadow
instead of box-shadow
to draw shadows behind irregularly shaped elements (like speech bubbles).:before
pseudo-element to the glass pane, give it the same background image as the preexisting background image, and blur it using filter: blur
.hyphens
Propertyhyphens: auto;
makes justified text much more readable; eliminates ugly whitespace rivers.hyphens
property.steps
with CSS animations to do discrete easing rather than continuous easing. This shows each frame in succession instead of continuously sliding the background image.Interestingly, my takeaways are almost identical to last year’s (mobile, mobile, mobile!):
As a bonus, I also concluded that bacon cupcakes actually exist, and are in fact delicious:
Just like last year, An Event Apart was extremely well-organized, informative and inspirational, and I’m very glad that I was able to attend!
]]>I can’t use a Mac for more than a few minutes without somehow interacting with Alfred. I use an excellent Alfred extension by Tony Wang called Sleep Display. When triggered via a hotkey, the extension powers off all connected displays without actually suspending/sleeping the computer. While it’s true that simultaneously pressing Control+Shift+Eject also accomplishes the same thing, the extension is useful for those whose keyboards don’t have an eject key.
The first public beta of the next version of Alfred, Alfred v2, became available a few weeks ago. Since v2 has done away with extensions and has replaced them with a feature called “Workflows”, Tony’s extension isn’t compatible with v2. Further, v2 doesn’t natively support shutting off displays as a built-in “System Command” when building Workflows (yet!).
To fill the gap, I decided to create a v2 Workflow called “Sleep Displays”. (Yes, I added an “s” to the the name of Tony’s original extension. Yes, I’m creative.)
The Workflow contains a binary program, directly lifted from Tony’s extension, that was built using the following code found at Stack Overflow:
#include <CoreFoundation/CoreFoundation.h>
#include <IOKit/IOKitLib.h>
/* Returns 0 on success and 1 on failure. */
int display_sleep(void)
{
io_registry_entry_t reg = IORegistryEntryFromPath(kIOMasterPortDefault, "IOService:/IOResources/IODisplayWrangler");
if (reg) {
IORegistryEntrySetCFProperty(reg, CFSTR("IORequestIdle"), kCFBooleanTrue);
IOObjectRelease(reg);
} else {
return 1;
}
return 0;
}
According to the Stack Overflow answer, the code can be compiled on Mac with gcc
using the flags -framework CoreFoundation -framework IOKIT
.
You sure can. Grab it right here.
Lacking the ability to sleep displays via a hotkey was the last thing preventing me from using Alfred v2 full time. Now I can do that with v2, and so can you.
]]>Update on June 8, 2017: After using this Git prompt for about 4½ years, I’ve made some minor tweaks to it.
Update on January 8, 2013: The Git prompt code was missing some initialization options that were local to my
zsh
configuration file (.zshrc
). I’ve updated the code to include the necessary options.
It has become rare for me to use a computer for longer than a few hours without using Git.
Although many great tools are available for graphically interacting with Git, I use Git almost exclusively on the command line, since that’s how and where I first learned to use Git. (I believe it would be beneficial for anyone trying to learn Git to learn on the command line; doing so exposes Git’s methodology in a fundamental way that promotes understanding, but that’s a topic for another post.)
Any time I find an opportunity to offset development workflow friction from myself to the computer, I jump on it. In that vein, in order to save time and be lazier when working with Git, I’ve pieced together a helpful shell prompt that conveys lots of information about a Git repository at a glance. The prompt works with zsh
, my shell of choice.
There are many examples of custom “SCM-enabled” shell prompts across the Internet, but I figured it was worth sharing mine here. The prompt’s code is adapted from this GitHub Gist, but incorporates features from other examples I’ve come across, namely:
git status
:
Here’s a contrived example that showcases the prompt (click on it for a larger version):
Here’s the code for the prompt, as of this writing. (If I make any changes to the code in the future, the most up-to-date version will always be available as a GitHub Gist.) You can paste this code directly into your .zshrc
, or save it in its own file and source that file in your .zshrc
.
# Adapted from code found at <https://gist.github.com/1712320>.
setopt prompt_subst
autoload -U colors && colors # Enable colors in prompt
# Modify the colors and symbols in these variables as desired.
GIT_PROMPT_SYMBOL="%{$fg[blue]%}±"
GIT_PROMPT_PREFIX="%{$fg[green]%}[%{$reset_color%}"
GIT_PROMPT_SUFFIX="%{$fg[green]%}]%{$reset_color%}"
GIT_PROMPT_AHEAD="%{$fg[red]%}ANUM%{$reset_color%}"
GIT_PROMPT_BEHIND="%{$fg[cyan]%}BNUM%{$reset_color%}"
GIT_PROMPT_MERGING="%{$fg_bold[magenta]%}⚡︎%{$reset_color%}"
GIT_PROMPT_UNTRACKED="%{$fg_bold[red]%}●%{$reset_color%}"
GIT_PROMPT_MODIFIED="%{$fg_bold[yellow]%}●%{$reset_color%}"
GIT_PROMPT_STAGED="%{$fg_bold[green]%}●%{$reset_color%}"
# Show Git branch/tag, or name-rev if on detached head
parse_git_branch() {
(git symbolic-ref -q HEAD || git name-rev --name-only --no-undefined --always HEAD) 2> /dev/null
}
# Show different symbols as appropriate for various Git repository states
parse_git_state() {
# Compose this value via multiple conditional appends.
local GIT_STATE=""
local NUM_AHEAD="$(git log --oneline @{u}.. 2> /dev/null | wc -l | tr -d ' ')"
if [ "$NUM_AHEAD" -gt 0 ]; then
GIT_STATE=$GIT_STATE${GIT_PROMPT_AHEAD//NUM/$NUM_AHEAD}
fi
local NUM_BEHIND="$(git log --oneline ..@{u} 2> /dev/null | wc -l | tr -d ' ')"
if [ "$NUM_BEHIND" -gt 0 ]; then
GIT_STATE=$GIT_STATE${GIT_PROMPT_BEHIND//NUM/$NUM_BEHIND}
fi
local GIT_DIR="$(git rev-parse --git-dir 2> /dev/null)"
if [ -n $GIT_DIR ] && test -r $GIT_DIR/MERGE_HEAD; then
GIT_STATE=$GIT_STATE$GIT_PROMPT_MERGING
fi
if [[ -n $(git ls-files --other --exclude-standard 2> /dev/null) ]]; then
GIT_STATE=$GIT_STATE$GIT_PROMPT_UNTRACKED
fi
if ! git diff --quiet 2> /dev/null; then
GIT_STATE=$GIT_STATE$GIT_PROMPT_MODIFIED
fi
if ! git diff --cached --quiet 2> /dev/null; then
GIT_STATE=$GIT_STATE$GIT_PROMPT_STAGED
fi
if [[ -n $GIT_STATE ]]; then
echo "$GIT_PROMPT_PREFIX$GIT_STATE$GIT_PROMPT_SUFFIX"
fi
}
# If inside a Git repository, print its branch and state
git_prompt_string() {
local git_where="$(parse_git_branch)"
[ -n "$git_where" ] && echo "$GIT_PROMPT_SYMBOL$(parse_git_state)$GIT_PROMPT_PREFIX%{$fg[yellow]%}${git_where#(refs/heads/|tags/)}$GIT_PROMPT_SUFFIX"
}
# Set the right-hand prompt
RPS1='$(git_prompt_string)'
I hope the prompt is as useful and as big of a time saver for you as it is for me!
]]>I noticed a small but annoying issue with Git that surfaced every once in a while: Git would suddenly start treating text files as if they were binary files. This example output from a relevant Stack Overflow question illustrates the issue:
$ git diff MyFile.txt
diff --git a/MyFile.txt b/MyFile.txt
index d41a4f3..15dcfa2 100644
Binary files a/MyFile.txt and b/MyFile.txt differ
In general, this issue could be viewed as a limitation of Git’s built-in diff capability, since it Git apparently is not great at comparing files that use variable-width encoding. For my job however, none of the source code our team works on is supposed to use variable-width encoding. For our purposes, it’s safe to assume that seeing this issue means that a developer mistakenly added non-ASCII characters to an otherwise-ASCII text file (Git’s limitations notwithstanding.)
I decided to create a Git update hook to reject problem commits when developers try to push them so these mistakes could be caught in an automated fashion when they happened, rather than having developers figure out when and why their diffs suddenly stopped working.
#!/bin/bash
#
# [Your existing update hook code here...]
#
refname="$1"
oldrev="$2"
newrev="$3"
# --- Reject this commit if it contains source files that Git views as binary files.
# First, make sure user is pushing a new branch and not deleting one. ($newrev will be all zeros when deleting.)
zero="0000000000000000000000000000000000000000"
if [ "$newrev" != "$zero" ]; then
# Tests whether Git thinks the passed filename ($1) is a binary file.
isBinary() {
binaryPattern=$(printf '%s\t-\t' -);
diffResult=$(git diff --numstat master $newrev -- "$1");
return $([[ "$diffResult" =~ "$binaryPattern" ]])
}
# Get a list of all relevant files to check: filter the names of all changed files in $newrev by extension.
checkFiles=$(git show --pretty="format:" --name-only $newrev | grep -E '\.(java|groovy|js|xml|css|less|sh)(\..+)?$')
binaryFilesFound=false
while read -r filename; do
if [ ! -z $filename ] && $(isBinary $filename); then
echo "*** File $filename appears to be a binary file, but should be plain text." >&2
binaryFilesFound=true
fi
done <<< "$checkFiles"
if $binaryFilesFound; then
echo "Please remove all non-human-readable characters from the above file(s)."
echo "For example, to remove NUL characters from a file:"
echo " tr < file.ext -d '\000' > file.tmp"
echo " mv file.tmp file.ext"
# Reject the push
exit 1;
fi
fi
# --- Finished
exit 0
This code lives inside the update hook script (hooks/update
) in our central Git repository. It runs on the server whenever someone does a git push
.
Here’s a summary of what the code does:
Using an update hook isn’t the ideal solution, since an ideal solution would prevent this type of mistake from being made at all. However, the update hook does prevent developers from accidentally propagating problematic changes.
If you know of a better way to solve this problem, I’d love to hear about it!
]]>